Yoga For Back Pain: 10 Yoga Poses To Strengthen Your Back & Ease Your Pain
If you’re dealing with back pain, yoga may be just what the doctor ordered. Yoga is a mind-body therapy that’s often recommended to treat not only back pain but the stress that accompanies it. The appropriate poses can relax and strengthen your body.
You may have heard that yoga can be beneficial when it comes to back pain. Here are 10 poses to try, why it works & more.
Practicing yoga for even a few minutes a day can help you gain more awareness of your body. This will help you notice where you’re holding tension and where you have imbalances. You can use this awareness to bring yourself into balance and alignment.
Keep reading to learn more about how these poses may be useful in treating back pain. Be sure to follow Carmen on her website for more helpful tips on yoga and how to integrate it into your life.
1. Cat-Cow

This gentle, accessible backbend stretches and mobilises the spine. Practicing this pose also stretches your torso, shoulders, and neck.
Muscles worked:
- erector spinae
- rectus abdominis
- triceps
- serratus anterior
- gluteus maximus
To do this:
- Get on all fours.
- Place your wrists underneath your shoulders and your knees underneath your hips.
- Balance your weight evenly between all four points.
- Inhale as you look up and let your stomach drop down toward the mat.
- Exhale as you tuck your chin into your chest, draw your navel toward your spine, and arch your spine toward the ceiling.
- Maintain awareness of your body as you do this movement.
- Focus on noting and releasing tension in your body.
- Continue this fluid movement for at least 1 minute.
2. Downward-Facing Dog

This traditional forward bend can be restful and rejuvenating. Practicing this pose can help relieve back pain and sciatica. It helps to work out imbalances in the body and improves strength.
Muscles worked:
- hamstrings
- deltoids
- gluteus maximus
- triceps
- quadriceps
To do this:
- Get on all fours.
- Place your hands in alignment under your wrists and your knees under your hips.
- Press into your hands, tuck your toes under, and lift up your knees.
- Bring your sitting bones up toward the ceiling.
- Keep a slight bend in your knees and lengthen your spine and tailbone.
- Keep your heels slightly off the ground.
- Press firmly into your hands.
- Distribute your weight evenly between both sides of your body, paying attention to the position of your hips and shoulders.
- Keep your head in line with your upper arms or with your chin tucked in slightly.
- Hold this pose for up to 1 minute.
3. Extended Triangle

This classic standing posture may help alleviate backache, sciatica, and neck pain. It stretches your spine, hips, and groin, and strengthens your shoulders, chest, and legs. It may also help relieve stress and anxiety.
Muscles worked:
- latissimus dorsi
- internal oblique
- gluteus maximus and medius
- hamstrings
- quadriceps
To do this:
- From standing, walk your feet about 4 feet apart.
- Turn your right toes to face forward, and your left toes out at an angle.
- Lift your arms parallel to the floor with your palms facing down.
- Tilt forward and hinge at your right hip to come forward with your arm and torso.
- Bring your hand to your leg, a yoga block, or onto the floor.
- Extend your left arm up toward the ceiling.
- Look up, forward, or down.
- Hold this pose for up to 1 minute.
- Repeat on the opposite side.
4. Sphinx Pose
This gentle backbend strengthens your spine and buttocks. It stretches your chest, shoulders, and abdomen. It may also help relieve stress.
Muscles worked:
- erector spinae
- gluteal muscles
- pectoralis major
- trapezius
- latissimus dorsi
To do this:
- Lie on your stomach with your legs extended behind you.
- Engage the muscles of your lower back, buttocks, and thighs.
- Bring your elbows under your shoulders with your forearms on the floor and your palms facing down.
- Slowly lift up your upper torso and head.
- Gently lift and engage your lower abdominals to support your back.
- Ensure that you’re lifting up through your spine and out through the crown of your head, instead of collapsing into your lower back.
- Keep your gaze straight ahead as you fully relax in this pose, while at the same time remaining active and engaged.
- Stay in this pose for up to 5 minutes.
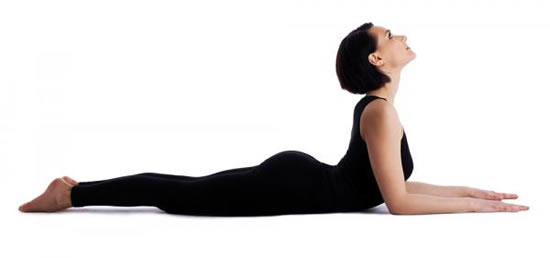
5. Cobra Pose

This gentle backbend stretches your abdomen, chest, and shoulders. Practicing this pose strengthens your spine and may soothe sciatica. It may also help to relieve stress and fatigue that can accompany back pain.
Muscles worked:
- hamstrings
- gluteus maximus
- deltoids
- triceps
- serratus anterior
To do this:
- Lie on your stomach with your hands under your shoulders and your fingers facing forward.
- Draw your arms in tightly to your chest. Don’t allow your elbows to go out to the side.
- Press into your hands to slowly lift your head, chest, and shoulders.
- You can lift partway, halfway, or all the way up.
- Maintain a slight bend in your elbows.
- You can let your head drop back to deepen the pose.
- Release back down to your mat on an exhale.
- Bring your arms by your side and rest your head.
- Slowly move your hips from side to side to release tension from your lower back.
6. Locust Pose

This gentle backbend may help relieve lower back pain and fatigue. It strengthens the back torso, arms, and legs.
Muscles worked:
- trapezius
- erector spinae
- gluteus maximus
- triceps
To do this:
- Lie on your stomach with your arms next to your torso and your palms facing up.
- Touch your big toes together and turn out your heels to the side.
- Place your forehead lightly on the floor.
- Slowly lift your head, chest, and arms partway, halfway, or all the way up.
- You may bring your hands together and interlace your fingers behind your back.
- To deepen the pose, lift your legs.
- Look straight ahead or slightly upward as you lengthen the back of your neck.
- Remain in this pose for up to 1 minute.
- Rest before repeating the pose.
7. Bridge Pose

This is a backbend and inversion that can be stimulating or restorative. It stretches the spine and it may relieve backaches and headaches.
Muscles worked:
- rectus and transverse abdominis
- gluteus muscles
- erector spinae
- hamstrings
To do this:
- Lie on your back with your knees bent and heels drawn into your sitting bones.
- Rest your arms alongside your body.
- Press your feet and arms into the floor as you lift your tailbone up.
- Continue lifting until your thighs are parallel to the floor.
- Leave your arms as they are, bringing your palms together with interlaced fingers under your hips, or placing your hands under your hips for support.
- Hold this pose for up to 1 minute.
- Release by slowly rolling your spine back down to the floor, vertebra by vertebra.
- Drop your knees in together.
- Relax and breathe deeply in this position.
8. Half Lord of the Fishes

This twisting pose energizes your spine and helps to relieve backache. It stretches your hips, shoulders, and neck. This pose can help alleviate fatigue and stimulate your internal organs.
Muscles worked:
- rhomboids
- serratus anterior
- erector spinae
- pectoralis major
- psoas
To do this:
- From a seated position, draw your right foot in close to your body.
- Bring your left foot to the outside of your leg.
- Lengthen your spine as you twist your body to the left.
- Take your left hand to the floor behind you for support.
- Move your right upper arm to the outside of your left thigh, or wrap your elbow around your left knee.
- Try to keep your hips square to deepen the twist in your spine.
- Turn your gaze to look over either shoulder.
- Hold this pose for up to 1 minute.
- Repeat on the other side.
Ask a Yoga Teacher
Get answers to all your questions from a professional yoga instructor
Have questions about yoga? We’ve answered frequently asked yoga questions to help you find out if yoga classes are right for you.
9. Two-Knee Spinal Twist

This restorative twist promotes movement and mobility in the spine and back. It stretches your spine, back, and shoulders. Practicing this pose can help relieve pain and stiffness in your back and hips.
Muscles worked:
- erector spinae
- rectus abdominis
- trapezius
- pectoralis major
To do this:
- Lie on your back with your knees drawn into your chest and your arms extended to the side.
- Slowly lower your legs to the left side while keeping your knees as close together as possible.
- You may place a pillow under both knees or in between your knees.
- You can use your left hand to gently press down on your knees.
- Keep your neck straight, or turn it to either side.
- Focus on breathing deeply in this position.
- Hold this pose for at least 30 seconds.
- Repeat on the opposite side.
10. Child’s Pose

This gentle forward fold is the perfect way to relax and release tension in your neck and back. Your spine is lengthened and stretched. Child’s Pose also stretches your hips, thighs, and ankles. Practicing this pose can help relieve stress and fatigue.
Muscles worked:
- gluteus maximus
- rotator cuff muscles
- hamstrings
- spinal extensors
To do this:
- Sit back on your heels with your knees together.
- You can use a bolster or blanket under your thighs, torso, or forehead for support.
- Bend forward and walk your hands in front of you.
- Rest your forehead gently on the floor.
- Keep your arms extended in front of you or bring your arms alongside your body with your palms facing up.
- Focus on releasing tension in your back as your upper body falls heavy into your knees.
- Remain in this pose for up to 5 minutes.
Does it really work?
One small study from 2017 assessed the effects of either yoga practice or physical therapy over the course of one year. The participants had chronic back pain and showed similar improvement in pain and activity limitation. Both groups were less likely to use pain medications after three months.
Separate research from 2017 found that people who practiced yoga showed small to moderate decreases in pain intensity in the short term. Practice was also found to slightly increase participants’ short- and long-term function.
Apart from back pain, yoga is known to help with countless other conditions, such as depression, anxiety and difficulty with concentration, just to name a few.
The bottom line
Although recent research supports yoga practice as a way to treat back pain, it may not be appropriate for everyone. Be sure to talk with your doctor before starting any new yoga or exercise program. They can help you identify any possible risks and help monitor your progress.
You can start a home practice with as little as 10 minutes per day. You can use books, articles, and yoga classes to guide your practice.
If you prefer more hands-on learning, you may wish to take classes at a Bundaberg yoga studio. It’s important to seek out classes and teachers who can cater to your specific needs.
Source:https://www.healthline.com/health/fitness-exercise/yoga-for-back-pain


